
Blanket Blocks: Crochet Pattern (Part 8)
This post may contain affiliate links.
Welcome to Part 8 of Our Crochet Blanket Square Series!
This week, we’re adding a brand new square to your growing collection.
If you’ve been following along since the beginning, you’ve already explored fan patterns, shell stitches, and plenty of creative techniques. Each square has been a chance to learn something new and build your skills, and this one continues that rhythm with satisfying repetition and a fun pop of texture.
Take a moment to appreciate how far you’ve come. From that very first stitch in Week One to the eighth square you're working on today, your blanket is slowly becoming a beautiful, handmade story—crafted with care, one stitch at a time.
So grab your yarn, settle in, and let’s get stitching. And as always—enjoy the process, celebrate your progress, and don’t forget to share your square with us. We love seeing your journey unfold!
Weekly Pattern Sampler: A Square at a Time! -
PART 8
✵ How It Works:
Every week, you’ll get a fresh pattern (don’t forget to sign up for our mailing list so you don’t miss out!).
Crochet two squares using complementary colours, and by the end of the week, you’ll have two pieces that highlight how much you’ve learned. 🌟
Each week, you'll add a new textured square to your growing collection, slowly building the foundation for a stunning, handmade blanket. It’s the perfect way to level up your skills, stay inspired, and create something truly unique—and it’s all done at your own pace. 🌟
This Week’s Square covers: Double crochet & bobble stitches 🎉
✵ Are you new to crochet?
Start your crochet journey with A Beginner’s Guide to Crochet: Starting Your Journey to a More Relaxed You and discover the calming power of crafting! Followed by this this post - for a step-by-step guide to get started with the basic crochet stitches.
Fan crochet patterns create beautiful, textured designs by working multiple stitches into the same stitch or space, forming a fan or shell shape. The stitch count and types of stitches may vary, but they remain consistent throughout the pattern. This versatile technique can be used with any type of yarn, allowing for endless creative possibilities.
Materials You’ll Need
Yarn Recommendations
The right yarn makes all the difference—it helps your stitches shine and makes the whole process more enjoyable.
Weight: Use worsted weight (#4) yarn. It’s easy to handle, gives great structure, and is ideal for beginners.
Fiber: Choose organic cotton or wool for softness, durability, and crisp stitch definition—perfect for showing off those bobbles and textures.
Colours: Select two complementary shades per square to create contrast and visual interest. Here are a few combos to inspire you:
🌿 Earthy Tones: Forest green & cream
❄️ Cool Neutrals: Smoky grey & pale blue
🌼 Bold & Bright: Cheerful yellow & muted lavender
Using two colours in each square adds depth and makes your stitchwork pop beautifully!
✵ More on the topic: Colour Therapy in Crochet: Choosing Yarns for Mood
🧶 Yarn & Hook Tips for This Pattern
Yarns to Avoid
Skip slippery yarns like silk blends or super thin lace-weight cotton—they can be tricky to control and might cause frustration. Go for something soft, smooth, and easy to work with.
Recommended Yarn
Try Lion Brand Basic Stitch Anti-Pilling Yarn in a light color. It’s beginner-friendly, doesn’t split easily, and the stitches show up clearly—perfect for practice. Plus, it holds up well wash after wash.
Best Hook to Use
Start with a G-6 (4mm) hook for worsted weight yarn. Metal or plastic hooks work great for beginners—they help the yarn glide smoothly.
If you're looking for a full set, the Yarniss Crochet Hook Set on Amazon is a great choice. It includes 14 sizes (2mm–10mm), has comfy rubber grips, and smooth aluminum tips to help keep your tension just right.
✵ More about crochet hooks: Understanding Crochet Hook Sizes and Types

Crochet Pattern
Skill Level – Easy
Pattern Notes
This pattern uses US crochet terms. The UK equivalent is provided.
I used a chunky yarn with a 6 mm hook.
The turning chain does not count as a stitch
Each row begins with 2 dc followed by a post stitch (BPdc in Row 2, FPdc in Row 3)
The pattern has 5 dc followed by a post stitch repeating across the row
Each row ends with 2 dc to mirror the beginning
Stitch abbreviation:
ch = chain(s)
st(s) = stitch(es
dc = Double Crochet (US)
tr = Treble Crochet (UK)
UK - Terms
tr = Treble Crochet
US - Terms
dc = Double Crochet
Note: In the following instructions, I’ll spell out the abbreviations to make it easier for beginners who are just learning to read crochet patterns.
Pin this patter to Pinterest to save for later!
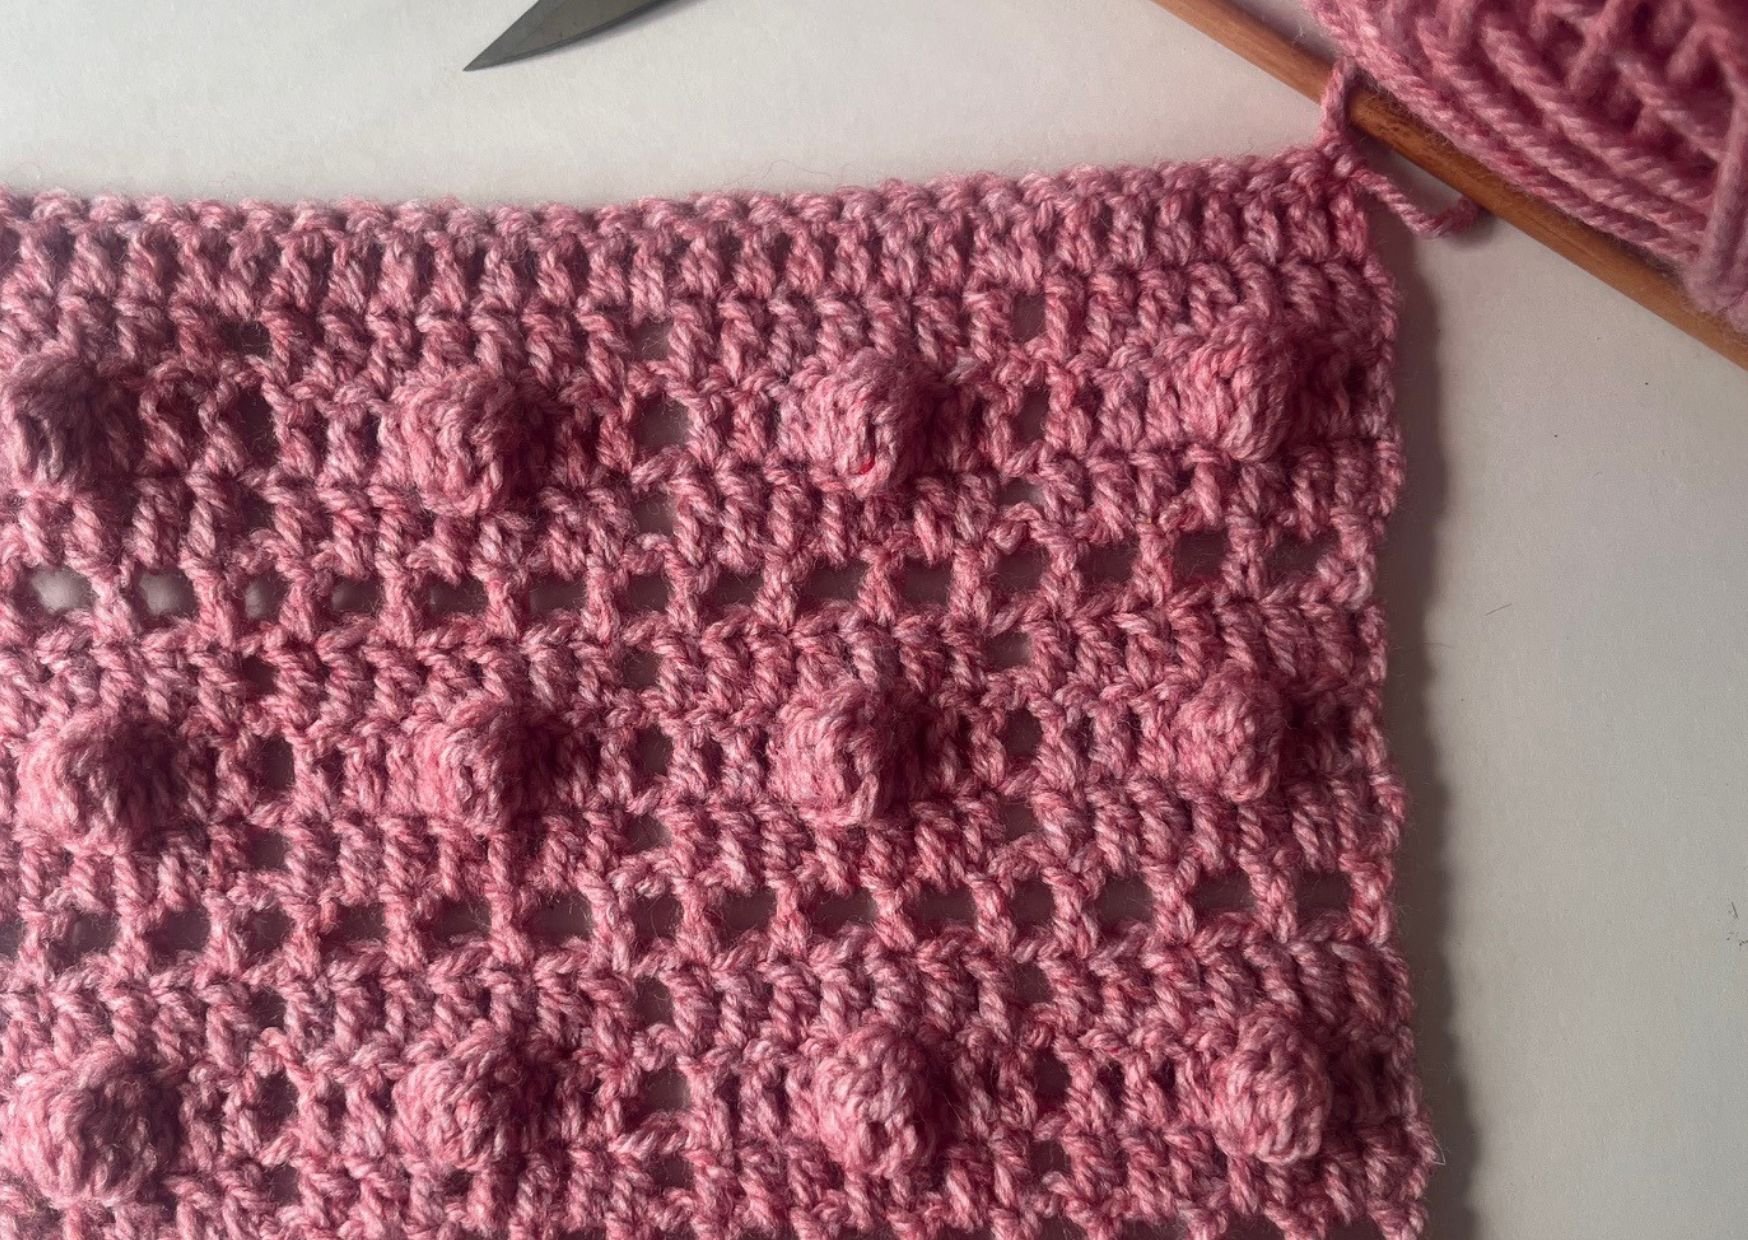
How to Crochet The Bobble Stitch

Yarn over (YO), insert your hook into the stitch or space where you want the bobble.
YO, pull up a loop (3 loops on hook).
YO, pull through 2 loops (2 loops remain).
Repeat steps 1–3 4 more times, all into the same stitch.
→ You’ll have 5 partial double crochets in the same stitch and 6 loops on your hook.YO and pull through all 6 loops on your hook.
Chain 1 to close the bobble (unless your pattern says otherwise).
💡 Notes:
The bobble pops to the back of your work as you crochet it—so for a textured look on the front, work bobbles on wrong side rows.
Want puffier bobbles? Add more dc stitches (e.g., 6 or 7 instead of 5).
Want flatter ones? Use hdc instead.
Start the Crochet Pattern
Instructions:
Foundation:
Ch 24 + 9. Want to make it bigger or smaller? Use a multiple of 8 + 9.)
Row 1:
Chain 2 (this doesn’t count as a stitch).
Make 1 double crochet in the 3rd chain from your hook.
Then make 1 double crochet in each chain all the way across.
You should have 31 double crochets at the end.
Turn your work.
Row 2:
Chain 2 (doesn’t count as a stitch).
Make 1 double crochet in each of the first 7 stitches.
Then:
Chain 1
Skip 1 stitch
Make 1 double crochet in each of the next 7 stitches
Repeat those 3 steps (ch 1, skip 1, 7 dc) until the end of the row.
Turn your work.
Row 3 (Bobble Row!)
Chain 2.
Now repeat this pattern across the row:
Make 3 double crochet
In the next stitch, make 1 bobble
Then make 3 more double crochet
Chain 1
Skip 1 stitch
Repeat the steps until the end of the row.
You’ll end with 3 double crochet after your last bobble.
Turn.
Row 4:
Chain 2.
Make 1 double crochet in each of the first 7 stitches.
Then:
Chain 1
Skip 1 stitch
7 double crochet
Repeat step 1-3 to the end of the row.
Turn.
Row 5:
Chain 2.
Now across the whole row:
Make 1 double crochet
Chain 1
Skip 1 stitch
Repeat these 3 steps (1 dc, ch 1, skip 1) until the end.
Turn.
Row 6
Chain 2.
Now across the whole row:
Make 7 double crochet
Chain 1
Skip 1 stitch
Repeat step 1-3 (7 dc, ch 1, skip 1) until the end.
Turn.
To Continue:
To continue the pattern, repeat from Row 2 onward until your square is the size you want.
To Finish:
Cut yarn, leaving a tail of about 15 cm
Pull the tail through the last loop on your hook to secure
Weave in all ends with a yarn needle
Block your finished square for best results
4 Tips for Success with This Crochet Pattern
▶ Use a light-colored yarn.
Light or pastel shades help you clearly see your stitches—especially the skipped stitches and where to place your bobbles. It makes counting and spotting mistakes much easier!
▶ Count your stitches often.
Each section repeats in groups of 8 stitches, so counting every few rows helps keep your pattern lined up and your square even. Stitch markers can also help you track repeats or the start of rows.
▶ Don’t worry if your bobbles don’t pop right away.
Bobbles sometimes sit flat until you give them a little push from the back. Once your fabric builds up, they’ll start popping naturally—and you can always gently push them through with your finger.
▶ Take your time with the bobble stitch.
The bobble is the most textured part, but it’s just 5 partial double crochets pulled together! If you get stuck, pause, breathe, and try again. Once you’ve done one or two, they’ll start to feel fun and rhythmic.
💛 You’ve Got This!
You just completed square #8 in the series—how amazing is that?
With every stitch, you’re building more than a blanket. You’re building skill, confidence, and a beautiful handmade story.
Whether your bobbles are bold or subtle, each one is a little celebration of your effort and growth. Keep going at your own pace, enjoy the process, and remember: it’s not about perfection—it’s about creating something that feels good to make.
You’re doing great.
Happy crocheting! ✨
What’s Next?
Pin this post: Save this tutorial to your Pinterest boards so that you can come back to it later.
Leave a comment: We love to hear your feedback. Tell me in the comments below!
square you master. The fan stitch you've just learned works beautifully as a standalone design element or as part of a larger project.
Don't forget to block your finished square before adding it to your collection, and we'd love to hear in the comments below if you found any special rhythm while working the fan repeats!
Happy crocheting until next week!
Eco-friendly crochet kits for beginners
Easy crochet patterns for beginners
More inspiring posts


Welcome to Part 8 of our crochet blanket square series! This week’s square features playful bobble stitches and relaxing rows of double crochet—perfect for beginners looking to add texture and variety to their growing blanket.