
How To Crochet A Coaster With T-Shirt Yarn
This post may contain affiliate links.
Are you looking for a quick, beginners friendly crochet project? Whether you're a seasoned pro or picking up a crochet hook for the first time, crochet coasters are a fun and practical household item and also one of the quickest handmade gifts you can make!
For the crochet coaster pattern, in this post, I use bulky, recycled t-shirt yarn and the coaster can be made in 10 minutes or less.
I'll walk you through each step, from choosing the right yarn and hook size to mastering the basic stitches, and finally creating your very own set of crochet coasters. So grab your crochet hook, get comfy, and let's get started.
Happy crocheting!
The beauty of creating a crochet coaster
Crochet coasters are fun, extremely quick to make and an excellent way to use any leftover yarn. I love the fact that they are so easy to make, and I often make them as a last-minute gift or stocking filler. Coasters are also a great way to test new colour combinations or to practice a new stitch.
On top of that crochet coasters come with a host of other hidden benefits.
Here are a few:
Protects Surfaces: The primary function of a coaster is to protect your furniture from heat, cold, and moisture. Crochet coasters effectively absorb the condensation from cold beverages or the heat from hot ones, preventing rings and stains on your tabletops.
Personalized Decor: Crochet coasters can be customized to match your home decor or personal style. You can choose colors, patterns, and designs that reflect your personality and aesthetic.
Eco-Friendly: Crochet coasters are reusable and washable, making them a more sustainable choice compared to disposable coasters.
Therapeutic Activity: The process of crocheting itself can be therapeutic. It's a relaxing hobby that can help reduce stress and anxiety, improve focus, and foster a sense of achievement when you complete a project.
Affordable and Unique Gift: Handmade crochet coasters make thoughtful, personalized, and cost-effective gifts for friends and family. They're great for housewarming parties, birthdays, or holidays.
Durability: Crochet coasters are durable and long-lasting. With proper care, they can last for years, making them a worthwhile investment.
Easy to Clean: Most crochet coasters can be easily cleaned in the washing machine or by hand, making maintenance a breeze.
Fun Learning Experience: If you're new to crochet, making coasters is a great way to learn and practice basic stitches. It's a small, manageable project that yields quick results, making it highly satisfying for beginners.
More on the topic: How to Choose the Perfect Yarn for Crochet Coasters
Excited to get started?
How to crochet a coaster
By the end of this guide, you'll know how to crochet a round coaster. Completing your first coaster is a great achievement, and it lays the groundwork for experimenting with various color blends and patterns.
What do you need to get started:
Skill Level: Beginner
Materials used for this project:
Hook: 7mm/K-10.5 to 9mm/M-13.
Yarn used for one coaster: approximately 6.5m / 7yds (45g)
The amounts given here are for Hoooked Zpagetti T-Shirt Yarn (120m (131yds) per 850g skein; #6/Super Bulky)
Size of the finished coaster:
Round coaster: 4”diameter / 10 cm
Yarn
For this coaster project, I used Hooked Zpagetti T-shirt yarn.
This yarn is ideal for coasters due to its durability, absorbency, and most importantly, it's machine-washable. This ensures that your coaster can handle frequent use and can be easily cleaned.
T-shirt yarn can vary a lot in thickness, even within the same brand, so you might need to experiment a little bit with your yarn and hook size.
Alternatively, you can use a thinner cotton or cotton blend yarn if you prefer.
➡ Regardless of the brand, the key is to ensure that the yarn you choose is 100% cotton or a high-cotton blend, as this will provide the best results in terms of both functionality and longevity.
Crochet hook
If you decide to use a different yarn, choosing the perfect crochet hook can make a significant difference in the success of your projects.
Here's how you can make the right choice:
Yarn Size: Ensure that your chosen yarn and hook are appropriately matched. The yarn label often suggests a suitable hook size. If you're substituting yarn, make sure it falls into the same size category as the original yarn specified in the pattern.
Hook Thickness: A general rule of thumb in crochet is that thicker yarn requires a thicker hook. However, if you use a thin hook with thick yarn, you can achieve a stable finish.
Stitch Appearance: The size of the crochet hook affects the appearance of the stitches. Smaller hooks produce tighter, firmer stitches, resulting in a more "closed" appearance of the project.
Comfort: Consider your comfort when choosing a hook. Different people prefer different types of hooks, so it's important to find one that feels good in your hand.
Project Requirement: The required hook size is usually included in the pattern. If you're following a pattern, it's best to use the recommended hook size for the best results.
➡ Remember, these are just guidelines, and there's room for personal preference and experimentation in crochet. You might find that you prefer working with a slightly larger or smaller hook than recommended, which is perfectly fine. The most important thing is that you're happy with the fabric you're creating.
More on the topic: Understanding Crochet Hook Sizes and Types
Shape
The two basic shapes for crochet coasters are the square and round shapes. But, even within these basic shapes, there are various methods of how you can create them.
For example, you can crochet a circle using joined rounds or continuous rounds.
In this post, we focus on creating a round coaster using joined rounds. There are, of course, different ways to join a round, and each method will create a slightly different finish.
➡ This pattern will use a slip stitch to join each round.
Abbreviations Used In Pattern
· mc = magic circle
· ch = chain
· sc = single crochet US (dc= double crochet UK)
· sl st = slip stitch
· st = stitch
· sts = stitches
· fo = fasten off
Extra Notes
Ch 1 at the start of each round is not counted as a stitch.
Stitch counts are shown at the end of each round [ ]
What’s the best size for a crochet coaster?
The ideal size for a crochet coaster typically depends on personal preference and the size of the mugs or cups you plan to use with it. However, a common size that works well for most drinkware is approximately 4 to 5 inches (10 to 12 cm) in diameter or across each side if the coaster is square. This size provides ample space for most cups, mugs, or glasses while still being small enough to easily store or carry around.
➡ For this project we will go for a diameter of 10 cm, however you can easily adjust this by adding or removing rounds.
Which stitch is the best to get started
Start with a single crochet stitch (known as a double crochet in the UK). In addition, the project starts with a magic circle and the rounds are joined with a slip stitch.
All the stitches you need for this coaster are covered in this post.
Magic circle to get started
Single crochet (double crochet UK)
Place two single crochet in the same stitch
Join the round with a slip-stitch
For this project, I will also use stitch markers. However, if you do not have these on hand, there's no need to fret. You can use a bobby pin. a string of different coloured yarn or a safety pin as a substitute.
Round coaster pattern
ROUND 1:
Magic circle, ch 1 (does not count as a st, here and throughout), 8 sc in circle. [8]
Slip-stitch to join the round
Round 1:
Create a magic circle.
Ch 1 (does not count as a st, here and throughout), 8 sc in circle. [8]
Join the round with a slip stitch into the first single crochet.
Round 2:
Ch 1 (this does not count as a stitch).
Make 2 sc in each stitch around. [16]
Join the round with a slip stitch into the first single crochet of the previous round.
Round 3:
Chain 1.
Make 2 single crochets in the next stitch, then 1 single crochet in the following stitch. Repeat this pattern (2 single crochets in one stitch, 1 single crochet in the next) all around. [24]
Join the round with a slip stitch into the first single crochet of the previous round.
Round 4:
Chain 1.
Make 2 single crochets in the next stitch, then 1 single crochet in each of the next two stitches. Repeat this pattern (2 single crochets in one stitch, 1 single crochet in the next two stitches) all around. [32]
Join the round with a slip stitch into the first single crochet or the previous round.
Fasten off your yarn and weave in any loose ends. Your round crochet coaster is now complete!
Crochet Stitch explanation
1. Magic circle

Image 1
Image 2
Image 3Starting crochet with a magic circle involves several steps.
Image 1: First, make a loop as if you're creating a slip knot. Then, insert the hook from back to front and wrap the yarn around it.
Image 2: In the next step, make two loops of yarn around three fingers with the yarn ball on the right and the tail on the left. Slide your crochet hook from right to left under both loops.
Image 3: Afterwards, complete the first single crochet by yarning over and drawing the yarn through both loops on your hook.
The key to the magic circle is closing the slip knot after Row 1. When you create the circle, ensure the side that can be closed is at the end. (Image 3)
➡ Remember, a magic ring is a wonderful tool for starting circular crochet because it allows the crochet to be pulled tight.
2. Single crochet
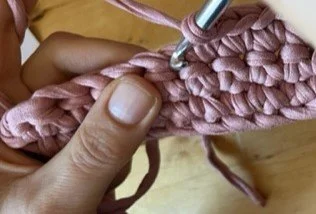
Image 1
Image 4
Image 2
Image 5
Image 3Image 1: Insert your crochet hook into the chain from your hook
Image 2: When you insert the hook, make sure it goes under both loops of the chain stitch.
Image 3: Yarn Over and Pull Through Yarn over (wrap the yarn over your hook) and then pull it through the chain stitch.
Image 4: You should now have two loops on your hook.
Image 5: Yarn over once more, and pull through both of the loops on your hook. You've just made a single crochet stitch!
3. Slip-stitch
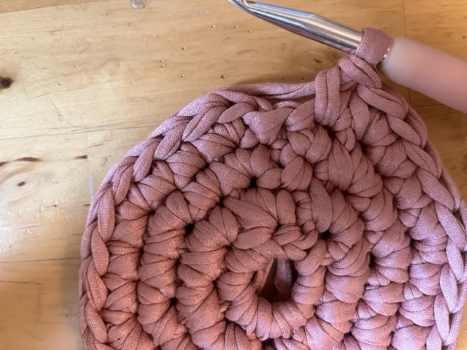
Image 1

Image 2

Image 3
Image 1: Finish Your Round, complete your round by crocheting the required number of stitches.
Image 2: Insert Your Hook, when you've finished your round, your hook should be in the last stitch you worked. To join the round with a slip stitch, insert your hook into the top of the first stitch of the round. This should be the stitch immediately after your starting chain if you began the round with a chain stitch.
Image 3: Complete the Slip Stitch To finish joining the round, yarn over your hook and pull it through both the stitch and the loop on your hook. This completes the slip stitch, effectively joining your round.
➡ Remember, the slip stitch is generally not counted as a stitch in the pattern unless specified. So when you start your next round, you'll typically skip over the slip stitch and start in the first proper stitch of the round.
4. Fasten off and finishing

Image 1

Image 2
Image 3Image 1: Cut your yarn leaving a tail that's long enough to weave in (usually about 6 inches). Pull your last stitch to create a big loop.
Image 2: Next, skip the stitch directly next to where you fastened off. Insert your hook into the following stitch, going under both loops of the stitch from back to front. Pull the yarn through.
Image 3: Going from back to front under the back loop only. Pull the yarn through. This creates a faux stitch that blends in with the rest of your stitches, making the seam invisible1.
Step 4: Weave in the loose ends of the yarn into the stitches of the coaster to secure them. Try to weave in different directions to ensure the tail won't come out.
Step 5: Steam Your Project To give your coaster a perfect finish, consider steaming it. Place a damp cloth over your coaster and press with a warm iron, or use a steamer, being careful not to touch the project directly with the iron or steamer to avoid scorching the yarn. The heat and moisture will relax the fibers, making your coaster lay flat and giving it a professional-looking finish.

A large selection of coasters made with recycled t-shirt yarn.Crocheting a coaster is a fun and easy project perfect for beginners. If you are more advanced, why not experience different stitches or colour combinations?
I hope you found this guide helpful. Remember, crochet is about enjoying the process and creating something beautiful that’s handmade.
Don't be discouraged if your first coaster isn't perfect - every stitch you make is progress.
Keep practising and before you know it, you'll be challenging yourself with more advanced patterns, creating coasters to use at home, give as gifts, or even sell at craft fairs.
I can't wait to see what you've made!
Share your finished coasters with me on Instagram by tagging @mouseandsparrow.
I love seeing your creations and celebrating your crochet journey with you.
Happy crocheting!
What’s Next?
Pin this post: Save this tutorial to your Pinterest boards so that you can come back to it later.
Leave a comment: We love to hear your feedback. Tell me in the comments below!
Eco-friendly crochet kits for beginners
Easy crochet patterns for beginners
More inspiring posts


Feeling stuck between UK and US crochet terms? You’re not alone—and you’re not doing anything wrong. This guide breaks down one of the most overlooked crochet basics: the confusing stitch name switch between British and American patterns. Get clarity, skip the frustration, and get back to the fun part—actually crocheting.