
How to Create Scroll-Stopping Crochet Product Photos That Sell
High-quality photography can make or break your success. Whether you’re selling crochet creations on Etsy, showcasing them on Instagram, or building a personal website, your photos are your first impression.
They tell the story of your craft, highlight your attention to detail, and inspire buyers to take action.
In this guide, you’ll learn how to photograph your crochet products to make them irresistible.
From setting up a simple home studio to styling and editing your photos, this guide will provide step-by-step instructions for capturing professional-quality images that elevate your brand and increase sales.

Lets get started!
What You’ll Need to Take Stunning Photos of Your Crochet Work
Essential Photography Equipment for Beginners
Smartphone or Entry-Level Camera: Modern smartphones have excellent cameras that are more than sufficient for product photography. If you want to invest, consider an entry-level DSLR or mirrorless camera.
Natural Light or Basic Ring Light: Natural light is free and often the most flattering.
For consistency, a ring light or softbox light is an affordable option.Affordable Props: For a neutral backgrounds use white foam or card boards, wooden boards, or backdrop curtains and a stand. Small plants, and simple decorative items can enhance your photos without overwhelming your products.

I use the UBeesize Ring Light with Overhead Phone Holder for nearly all my photos and video tutorials, and it’s a game changer. The even lighting makes crochet details pop, while the overhead holder is perfect for hands-free tutorial shots.
The wireless remote is a lifesaver, letting me snap photos or start videos without touching my phone, so every shot is steady and professional. It’s perfect for creators looking to elevate their content. Check it out here!
Optional Tools for Advanced Setups
A flexible Tripod keeps your camera steady and ensures sharp images.
▶ DIY option: If you are using a smartphone you can also use a books and a binder clip
A Reflectors bounces light onto your product to eliminate shadows. I used to struggled with harsh shadows and uneven lighting. That’s when I discovered the NEEWER Reflector. The translucent side softens the light beautifully, while the gold, silver, white, and black sides give me complete control over the look of my photos.
Whether I need to bounce light to eliminate shadows or add a warm glow to my pieces, this reflector does it all. It's lightweight, collapsible, and easy to carry, making it perfect for both studio setups and outdoor shoots.
▶ DIY option: Use a piece of white foam board.
A Lightbox creates an evenly lit environment for small items. The Whether I’m photographing a tiny coaster or a delicate scarf the PULUZ Mini Photo Studio Light Box ensures every photo looks polished and professional. It’s lightweight, easy to set up, and perfect for small products.
▶ DIY option: Make a DIY lightbox with a cardboard box, tissue paper, and a poster board. Cut out sides, cover with tissue paper, and add curved poster board inside. Light it with lamps for perfect crochet photos!
Tips for Starting Small
Focus on natural light and minimal props to get started. You can upgrade your tools as your shop grows.
Experiment with what you already have at home, such as wooden cutting boards or fabric scraps as backgrounds.
Photo Area Setup
Setting up a basic area for your photo shoot is crucial for consistent lighting and a clean backdrop. You can create a simple set up using a few key elements.
Find a well-lit area with ample natural light or consider using artificial lighting.
A window with diffused light is ideal, especially for showcasing delicate crochet pieces. If you are using natural light, find the time of day when the light is soft and balanced.
Use a white or light-coloured backdrop to create a neutral background that emphasizes the crochet item. Seamless paper is an excellent choice for a clean and professional look.
▶Tip
I primarily use large sheets of white or light grey card paper for most of my product photography. These are inexpensive, versatile, and provide a clean, professional backdrop that complements crochet textures beautifully.
If you’re using a white background but notice a blue tint in your images, try switching to a light grey or grey background. White surfaces can sometimes reflect light differently, especially in natural lighting, causing unwanted color casts. A light grey sheet helps balance the light and prevents the blue tones from dominating, creating a more neutral and true-to-life result.
For best results, position the grey background to reflect light evenly across your setup. If you're still getting unwanted tints, adjust the white balance in your camera settings or editing software to achieve a clean, polished look.
Find The Perfect Space To Take Your Photographs
When it comes to photographing your crochet work, finding the right space, particularly one with ample natural light, can help bring out the textures and colours of your project in the most flattering way. The key is to find the largest window in your home to capture soft, diffused light. Natural daylight, especially in the morning or late afternoon, can create a warm, inviting glow that highlights your crochet pieces without the harsh shadows caused by direct sunlight.
▶ Here are some tips for setting up the perfect space:
Find a well-lit spot in your home near a large window. Morning or late afternoon light works best.
Use a table or flat surface to set up your photography area.
Declutter the space to maintain focus on your crochet products.
Lighting Basics for Crochet Photography
The right lighting can enhance the details and textures of your work, while poor lighting can make it difficult to see the true colours and craftsmanship. Whether you're relying on natural light or setting up your own lighting solution, understanding how to work with light will make a huge difference in the quality of your photos.
▶ Here are some essential lighting tips:
Natural Light: Position your setup so the light comes from the side or front, not the back. Avoid direct sunlight to prevent harsh shadows.
DIY Lighting Solutions: If natural light is limited, use a ring light or place a desk lamp with a soft white bulb close to your setup.
Using Backdrops for Crochet Photography
Choosing the right backdrop help your crochet products stand out without distractions. A simple, neutral backdrop allows the intricate details and colours of your crochet work to take centre stage, while adding texture can bring a sense of depth and warmth to the photo. Whether you're looking for a minimalist look or something with a bit more character, a backdrop can change the overall feel of your image.

Seamless Photography
What is Seamless Photography?
Seamless photography uses a continuous, unbroken background to create a clean, professional look. This style highlights your crochet product’s texture and detail.
Seamless photography is a popular technique for showcasing crochet products, creating a clean and professional look. Seamless paper rolls come in various colors, providing a wide range of options to suit your style and branding.
How To Set Up a Seamless Background
To achieve seamless backgrounds, use a large piece of seamless paper or create a backdrop by hanging a fabric or paper from a backdrop stand. Position your subject in front of the seamless backdrop, ensuring a clean and even surface. Use natural light or artificial lights to illuminate the subject from the side or from the front, avoiding harsh shadows that can detract from the product's beauty.
Use a roll of white paper or fabric to create a smooth curve from the vertical to the horizontal surface. Tape it in place to avoid creases.
Ensure your product is well-lit, with shadows minimized.
Lighting Tips for Seamless Photography
Place your light source slightly above and in front of the product to highlight details and reduce harsh shadows.
Use reflectors or white foam boards to bounce light onto the darker areas.
Examples
Coasters: Arrange in a stack or spread out to show patterns.
Scarves: Drape across the seamless background to highlight the drape and texture.
Market Bags: Position upright and fill with lightweight items to showcase size and functionality.
Flatlay Photography
Flatlay photography is another popular technique for showcasing crochet products. Flatlay images are created by arranging the crochet item on a flat surface, often with props and other elements, from a top-down perspective. To achieve a compelling Flatlay, use props like yarn, needles, or other crochet-related items to add visual interest and context to the image.
Experiment with different arrangements of props to create a dynamic and engaging composition. Consider using a variety of textures, colors, and patterns to create a visually appealing flatlay. Use a natural light source or artificial lights to illuminate the scene evenly, avoiding harsh shadows.

How to Compose a Stunning Flatlay
Start with a Neutral Background: A wooden table, white foam board, or eco-friendly fabric works well.
Position Your Crochet Item: Place it at the center or slightly off-center as the focal point.
Add Props: Complementary props like yarn balls, hooks, coffee mugs, or small plants add context without distracting from the product.
Balance the Composition: Ensure props are evenly spaced and don’t clutter the frame.
Examples
Small Items: Lay out coasters with a coffee mug and a book to suggest usage.
Larger Items: For blankets, fold neatly or layer with coordinating cushions and yarn skeins.
▶ Here are some tips for perfect crochet photography backdrops:
Neutral or textured backdrops work best for crochet products. White foam boards, wooden planks, or eco-friendly linen fabric are great options.
Tape or clip the backdrop to a vertical surface for seamless shots.
DIY Lightbox Instructions for Crochet Photography
If you're looking to improve your crochet photography on a budget, creating a DIY lightbox is a fantastic option. A lightbox provides soft, even lighting that eliminates harsh shadows and highlights the intricate details of your crochet pieces. With just a few materials, you can create a professional setup right at home. If you prefer to purchase one the PULUZ Mini Photo Studio Light Box is a good option to get started.
▶ Here’s how to create your own lightbox for stunning crochet photos:
Take a cardboard box and cut out three sides, leaving a border of 1-2 inches.
Cover the cut-out sides with white parchment paper or thin fabric.
Place a piece of white poster board inside the box for the background.
Use desk lamps or LED strips to light the box from the sides and top
Styling Basics
Styling is key to creating visually appealing crochet product photographs. To style your crochet products for photography, consider the type of crochet item you are photographing. For example, a scarf might be styled draped over a chair or around a mannequin's neck, while a hat could be placed on a table or on a prop like a book. Use your creativity to come up with interesting and unique ways to style your crochet items. Consider the overall aesthetic of your brand and use props that reflect your brand identity. If your brand is whimsical and colorful, use props in bright colors and playful textures. If your brand is more minimalist and modern, use props in neutral colors and clean lines. Remember to focus on showcasing the details and beauty of your crochet work. Ensure that your styling complements the crochet item, rather than overwhelming it.
Visual Appeal Without Distraction
Choose props and backgrounds that enhance your crochet product without stealing the spotlight. Neutral tones work best.
Avoid busy patterns or overly bright colors that clash with your product.
Eco-Friendly Props
Use natural materials like reclaimed wood, organic cotton fabric, or small potted plants to align with an eco-conscious aesthetic.
Adding Scale
Use hands, rulers, or everyday items like coffee mugs to show the size of your crochet product. This is especially important for smaller items like baby booties.
Seasonal Styling
For winter items: Add candles, pinecones, or faux snow.
For summer items: Use bright natural light and fresh flowers.
How to Take Stunning Photos with Your iPhone

You don’t need a professional camera to capture beautiful images of your crochet work. With the powerful camera features on your iPhone, you can easily take high-quality photos that showcase your projects in the best light. From adjusting settings to utilizing the right angles, here’s how to make the most of your iPhone’s camera for crochet photography.
1. Start with the Basics: Clean Your Lens
Before diving into settings, make sure your iPhone camera lens is clean. A smudged lens can lead to blurry photos, even with the best settings.
To clean it, simply use a soft, lint-free cloth to gently wipe away any fingerprints, dust, or smudges. This quick step ensures that you’re starting with the clearest possible image and can avoid frustrating blurry shots later.
2. How to Optimize Your iPhone Settings for Perfect Lighting
Lighting is crucial in photography, especially when it comes to showcasing the textures and details of your crochet projects. With the right settings on your iPhone, you can make the most of both natural and artificial light to capture stunning, well-lit photos of your creations.
Here’s how to use your iPhone’s settings to achieve the perfect lighting for crochet photography
1. Use Natural Light to Your Advantage: Natural daylight is ideal for crochet photography, as it highlights the texture and colors of your yarn without artificial alterations.
How to Optimize: When positioning your crochet project near a window, make sure you enable Auto Exposure. Tap on the screen where you want to focus and adjust the exposure slider by dragging the sun icon up or down. This helps you control how bright or dim your image appears, ensuring the lighting is just right.
▶ Pro Tip : Avoid direct Sunlight, as it can create harsh shadows and overexpose some parts of your work. Instead, opt for indirect light or shoot in the early morning or late afternoon when the sunlight is softer.
2. Use Artificial Light for Consistency: If you're shooting in a space with limited natural light, artificial lighting options like a ring light or softbox are great solutions. Your iPhone has built-in features to help optimize artificial lighting as well.
How to Optimize: If using a desk lamp or ring light, adjust the white balance by tapping the screen to focus and holding until the exposure and white balance are locked. This prevents your crochet work from looking too yellow or blue, keeping the true colors intact.
▶ Pro Tip: Pair artificial lighting with Night Mode (available on iPhone 11 and newer models) for improved low-light performance. This allows you to capture clearer, brighter photos even in dimly lit environments.
3. Avoid Using Flash: While the iPhone’s flash is useful in some scenarios, it’s not ideal for crochet photography. Flash can flatten textures and create unwanted glare or shadows that hide the beauty of your work.
How to Optimize: Simply turn off the flash by tapping the flash icon at the top of the screen (it should appear as a lightning bolt) and ensure it's disabled. Relying on natural or controlled artificial lighting will give you much better results.
▶ Pro Tip: If you need additional lighting, use a soft light source or diffuse the light with a white sheet or paper to prevent harsh shadows.
3. How to Adjust iPhone Camera Settings for Crochet Photography
Your iPhone comes with several built-in features to help you capture professional-looking photos, even without the need for additional equipment. With just a few adjustments to your settings, you can elevate the quality of your crochet photos, highlighting textures, colours, and intricate stitches.
Here’s how to make the most of your iPhone's camera features:
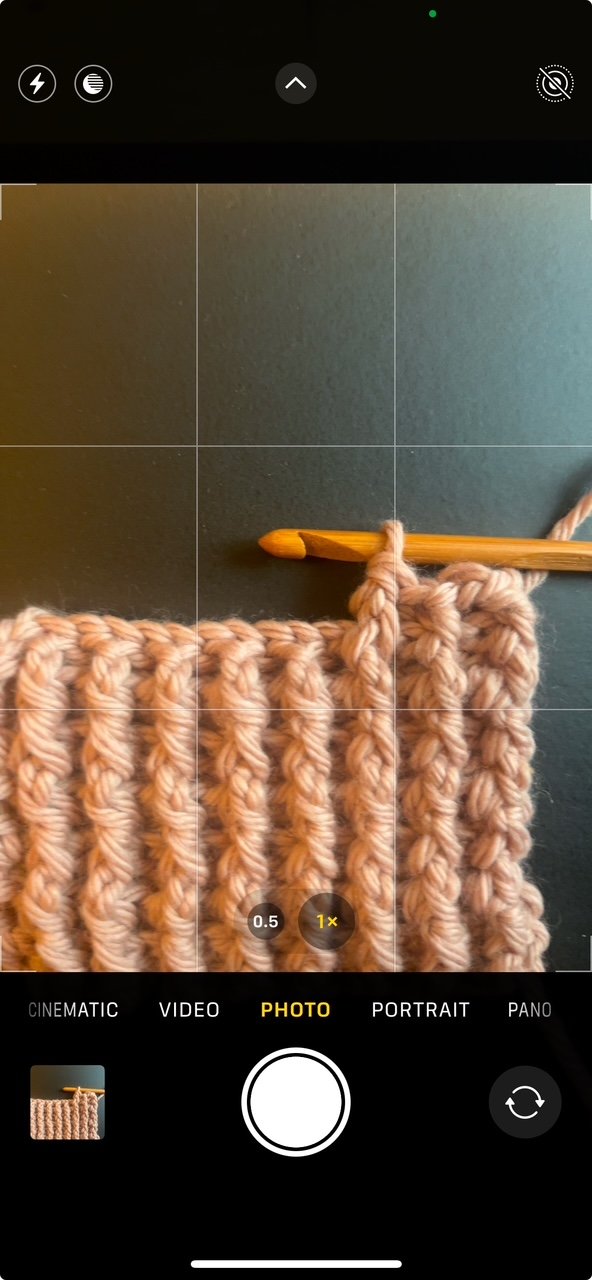
1. Enable Grid Lines for Composition
The grid lines are a simple yet effective way to compose your shots, ensuring that your crochet projects are aligned and balanced. Using the Rule of Thirds can help make your photos more aesthetically pleasing.
How to Adjust: Go to Settings > Camera > Grid and toggle it on. This will display a 3x3 grid on your screen, helping you frame your crochet pieces perfectly.
2. Focus and Exposure Control
Getting the right focus and exposure is essential to showcasing your crochet pieces clearly and brightly. The iPhone’s tap-to-focus feature allows you to choose the focal point, and you can manually adjust the exposure to ensure the right lighting for your photo.
How to Adjust: Tap on the area you want to focus on, such as the details of your crochet stitches. Hold your finger to lock the focus and exposure, then adjust the exposure slider up or down to brighten or darken the photo as needed.
3. Use Portrait Mode for Depth and Focus
Portrait Mode creates a professional look by blurring the background (bokeh effect) and keeping the subject of your crochet work in sharp focus. This is ideal for highlighting intricate details like your stitches or texture.
How to Adjust: Open the Camera app and swipe to Portrait Mode. Position your crochet project within the frame, and your iPhone will automatically create a stunning depth-of-field effect, emphasizing your work while softening the background.
4. Turn on HDR (High Dynamic Range) for Better Detail
HDR is a fantastic tool for capturing photos with balanced lighting, especially when you have high contrast between light and dark areas, like light yarn on a dark surface. It ensures that details in both the shadows and highlights are clearly visible.
How to Adjust: Make sure Auto HDR is enabled in Settings > Camera > Smart HDR. Your iPhone will automatically use HDR to capture the most detail, even in challenging lighting conditions.
5. Use Portrait Mode for Detailed Close-Ups
For detailed shots of your crochet pieces, Portrait Mode is ideal. It helps isolate your project from the background and makes your crochet stitches stand out. The depth of field effect adds a professional touch, perfect for showcasing your work in the best light.
How to Adjust: Open the Camera app and swipe to Portrait Mode. Position your crochet project to ensure it is in focus, with the background softly blurred.
6. Macro Mode (for newer iPhones)
For capturing the finest details of your crochet pieces, such as individual stitches, Macro Mode is invaluable. This mode allows you to get extremely close to your subject while maintaining sharp focus.
How to Adjust: On iPhone models like the iPhone 13 Pro or later, get within a few centimeters of your crochet piece to activate Macro Mode. Your camera will adjust automatically to capture highly detailed close-ups.
7. Turn on Live Photo for Additional Options
Live Photo captures a short video of your crochet project in action, which can later be used to create gifs or pick the best still frame for your final photo.
How to Adjust: Tap the Live Photo icon (a circle with concentric rings) at the top of your Camera screen to turn it on. Once you take the photo, you can scroll through the frames and choose the one that best captures the essence of your crochet piece.
4. Pay Attention to Composition
Good composition can elevate your crochet photography.
Use these tips:
Use the Grid Setting to Enhance Composition
The grid feature on your iPhone can be a powerful tool for creating well-balanced and visually engaging compositions. It helps you apply the Rule of Thirds, which divides your frame into nine equal sections, allowing you to position your crochet projects in a more dynamic way that draws the viewer's eye.
Rule of Thirds: Enable the grid in your camera settings (Settings > Camera > Grid) to help position your crochet piece off-center for a more dynamic shot.
Angles and Perspectives: Take photos from different angles—flat lay (overhead), side view, or close-ups. Experiment with a slight tilt for a more artistic look.
Props and Backgrounds: Use simple, clean backgrounds that won’t distract from your crochet work. Neutral tones or textured surfaces like wooden tables or linen cloths work beautifully. Add props like yarn balls, crochet hooks, or greenery for context
5. How To Edit Your Photos With Your iPhone
Even the best photos can benefit from a little post-editing. Editing your crochet photos allows you to fine-tune aspects like brightness, contrast, and sharpness, ensuring that your final images are as eye-catching as possible.
Whether you want to enhance the texture of your stitches, adjust the lighting, or remove any unwanted distractions, editing can help bring your photos to the next level.
You don’t need professional software—your iPhone’s built-in editing tools or a photo-editing app can do the trick.
Here’s how you can enhance your crochet photos with your iphone:

How to use your iPhone’s Editing Tools
Adjust Brightness, Contrast, and Shadows
To ensure your crochet photos look clear and well-lit, adjusting the brightness, contrast, and shadows can make a big difference. This helps highlight the details of your work, even in challenging lighting situations.How to Adjust: After taking your photo, open the Photos app, tap Edit, and use the sliders for Brightness, Contrast, and Shadows to fine-tune the exposure and overall look of your photo
Enhance Sharpness
If you want to emphasize the fine details of your crochet stitches, the sharpness tool is your best friend. This can bring out the texture and definition of your crochet work, making the stitches more prominent.How to Adjust: In the Edit menu, tap on the Sharpness icon and slide it to the right to add more definition to your crochet piece.
Vibrancy and Saturation
Sometimes, adjusting the vibrancy or saturation can make your crochet colours pop, especially if you’re working with bright or rich hues. A slight increase in saturation can make the colors stand out without overdoing it.How to Adjust: Tap on the Vibrance slider to increase the intensity of your colors or adjust the Saturation to boost or reduce the overall color saturation.
Third-Party Apps for Advanced Editing
For even more control over your crochet photos, third-party apps like Lightroom Mobile, Snapseed, or VSCO offer advanced editing tools. These apps allow you to fine-tune colors, add filters, and enhance textures with more precision.
Lightroom Mobile
Lightroom is great for color grading and fine-tuning exposure, shadows, and highlights. You can also create presets that apply a consistent style across all your crochet photos.
How to Use: Import your photo into Lightroom, then use the Basic editing tools to adjust exposure, contrast, and color balance. Lightroom also allows you to use the Texture and Clarity sliders to bring out details in your crochet stitches.
Snapseed
Snapseed offers powerful tools for removing imperfections, adjusting lighting, and adding unique effects. The Detail section, for example, enhances fine textures, making your crochet stitches stand out.
How to Use: Open your photo in Snapseed, go to Tools, and select Details to sharpen textures. You can also use the Selective tool to adjust specific areas of the photo for more precise editing.
VSCO
VSCO provides a variety of filters that can give your crochet photos a polished, professional look. It’s ideal for adding a subtle mood or vibe to your photos, whether you're aiming for a clean, bright look or a moody, vintage feel.
How to Use: After importing your photo, experiment with VSCO’s filters, then adjust the intensity of the effect to suit your style. You can also tweak the exposure, contrast, and sharpness for additional customization.
6. Additional Tips for Perfect Crochet Photos
Taking beautiful photos is not just about mastering the settings on your iPhone—it’s also about refining your technique and approach to ensure consistency and clarity in your images. Whether you're showcasing your work on your blog, Instagram, or Etsy, these extra tips can help you take your photos to the next level. Here are a few simple but effective ways to improve your crochet photography:
How to Enhance Your Crochet Photography with These Additional Tips
Use a Tripod for Steady Shots
A tripod is a game-changer when it comes to stability. If you're shooting in low light or trying to capture detailed close-ups, a tripod ensures your iPhone stays steady and your shots remain sharp.
How to Use: Attach your iPhone to a tripod and adjust it to your desired angle. This will prevent blurry photos caused by shaky hands, giving you perfectly crisp shots every time.
Live Viewfinder for Spotting Imperfections
Before taking the shot, use your iPhone's Live Viewfinder to preview your crochet project through the camera lens. This allows you to spot any imperfections like stray threads, wrinkles, or uneven lighting, giving you a chance to fix them before snapping the perfect photo.
How to Use: Hold your iPhone in position and scan the entire crochet piece using the viewfinder. Look closely for anything that might distract from the final image, such as visible imperfections or distracting elements in the background.
Consistency for Branding
If you're using your crochet photos for your online business or social media, consistency is key. Maintaining a consistent style in terms of lighting, background, and editing will help build a recognizable brand identity and make your content look cohesive.
How to Achieve: Stick to the same lighting setup for every photo shoot and choose a backdrop that aligns with your brand’s aesthetic. Use similar editing styles or filters to create a signature look for all your posts, whether you're sharing photos on Instagram, your Etsy shop, or your blog.
Optimizing Photos for Etsy
When selling your crochet creations on Etsy, your product photos are often the first impression potential customers will have of your work. High-quality, well-lit images can make all the difference in attracting buyers and showcasing the true beauty of your handmade items. In this section, we’ll explore how to optimize your crochet photos for Etsy, ensuring they stand out and help drive sales.
Check out what’s selling on Etsy: 26 Bestselling Crochet Items to Sell On Etsy
Etsy-Specific Photo Requirements
Recommended dimensions: 2000px on the shortest side for high-quality images. This ensures your photos look sharp and professional on any device.
File type: JPEG or PNG with sRGB color profile. This ensures the colors in your photos appear as intended across different screens.
Ensuring these specifications are met will help your photos look crisp, professional, and true to color when viewed by potential buyers.
Creating Eye-Catching Thumbnails
Use your best image as the thumbnail to grab attention in search results. It’s crucial to select the most striking image of your crochet item, one that highlights its details and craftsmanship.
Ensure the product is centered and clearly visible. Thumbnails are small, so make sure the focal point of your crochet item stands out, with no distracting elements around it.
A great thumbnail is key to getting customers to click on your listing and explore your product further.
Showcasing Multiple Images
Include a variety of angles: front, back, close-up of stitches, and lifestyle shots. This helps buyers see the full scope of your product and understand its quality and functionality.
Add a “how it’s used” image to help buyers visualize the product in their lives. For example, show your crochet item being used in a home setting, such as a dishcloth in a kitchen, to highlight its practical use.
Multiple, well-chosen images provide a clearer, more engaging picture of your crochet items, helping buyers make informed decisions.
Ready to start selling your crochet products? Check out this post first

You Made it to the end of this post—Congratulations!
Photography is one of the most powerful tools for showcasing your crochet creations and building a successful online shop. With just a smartphone, a little creativity, and the techniques outlined in this guide, you can create professional photos without breaking the bank.
Remember, the key is to highlight the unique textures, colours, and craftsmanship of your work while keeping the overall presentation clean and inviting. As you practice and refine your skills, you’ll see how great visuals can transform your brand and connect your crochet products with buyers who truly appreciate them.
Take it one step at a time, experiment with different styles, and most importantly—have fun with the process! Your creations deserve to shine
Happy Crocheting!
What’s Next?
Pin this post: Save this tutorial to your Pinterest boards so that you can come back to it later.
Leave a comment: We love to hear your feedback. Tell me in the comments below!
More inspiring posts


The concept of "living fully" might sound like a cliché, but it holds profound significance.
Living fully means seizing every opportunity, breaking free from societal expectations, and flourishing in all aspects of life.
This blog is dedicated to every woman who seeks empowerment, fulfilment, and joy. Let's explore how you can live fully, flourish, and thrive.