
Blanket Squares: Crochet Basketweave Stitch (Part 4)
This post may contain affiliate links.
Welcome to Part 4 of Our Crochet Blanket Square Series: The Basket Weave Pattern
I hope you're excited to dive into this next step of our crochet blanket journey!
If you've been following along, you've already mastered the Single-Colour Granny Square last week and had some fun with other patterns in the series.
Now, we're exploring the Basket Weave pattern. This texture-rich stitch adds a beautiful, cosy feel to your blanket squares.
This crochet pattern is a fantastic next step and this crochet stitch is a lot easier than what it looks.
Ready to create something gorgeous?

From Beginner to Blanket: Learn the Crochet Basketweave Stitch
Weekly Pattern Sampler: A Square at a Time!
- PART 4
✵ How It Works:
Every week, you’ll get a fresh pattern (don’t forget to sign up for our mailing list so you don’t miss out!).
Crochet two squares using complementary colours, and by the end of the week, you’ll have two pieces that highlight how much you’ve learned. 🌟
Each week, you'll add a new textured square to your growing collection, slowly building the foundation for a stunning, handmade blanket. It’s the perfect way to level up your skills, stay inspired, and create something truly unique—and it’s all done at your own pace. 🌟
This Week’s Crochet Pattern: Crochet Basketweave Stitch 🎉
✵ Start your crochet journey with A Beginner’s Guide to Crochet: Starting Your Journey to a More Relaxed You and discover the calming power of crafting! Completely new to crochet? Check out this post for a step-by-step guide before you get started!
Materials You’ll Need
Yarn Recommendations
Choosing the right yarn will make crocheting easier and more enjoyable while ensuring your final blanket looks stunning. Plus, selecting complementary colours can turn each square into a true visual masterpiece!
Yarn Weight:
Go for a light to medium-weight yarn—worsted weight (#4). It’s easy to work with and provides the right amount of structure for textured stitches.
Material:
Organic cotton or wool are excellent options. They’re soft, durable, and provide just the right grip for beginners, making it easier to manipulate stitches without frustration. They also showcase textured stitches beautifully, giving your squares added depth.
Colour Choices:
When choosing colours, aim for complementary shades that will stand out against each other but still work harmoniously. For example:
Earthy Tones: Combine a deep forest green with a soft cream.
Cool Neutrals: Pair a smoky grey with a pale blue.
Bold and Bright: Use a cheerful yellow alongside a muted lavender.
Crocheting each square in two complementary colours will give your blanket a cohesive yet dynamic look. The contrast will make each bobble pop and highlight your hard work as your blanket grows.
✵ More on the topic: Colour Therapy in Crochet: Choosing Yarns for Mood
Yarns to avoid:
Steer clear of yarns that are too slippery (like silk or rayon blends) or too fine (super thin cotton or lace-weight yarn). These can make stitches difficult to control, leading to unnecessary frustration. The goal is to choose yarn that feels good in your hands and stays on the hook.
Recommended Yarn for Practicing This Crochet Stitch
If you are new to crochet I recommend a light coloured yarn from the Lion Brand Yarn Basic Stitch Anti-Pilling Knitting selection.
Here's why:
Beginner-Friendly Texture
This yarn is smooth, soft, and easy to work with, making it perfect for practicing single crochet stitches. It glides effortlessly over your hook without splitting, so you can focus on your technique instead of fighting with tricky yarn.Anti-Pilling for Long-Lasting Projects
Ever notice how some yarns fuzz up or look worn after a few washes? Not this one. The anti-pilling technology ensures that your finished pieces stay fresh and neat, even with regular use.Versatile Weight
This yarn is a medium (4) weight, which is ideal for beginners. It’s not too thin or too thick, making it easy to see your stitches and handle the yarn as you learn.A Light Colour
A light yarn is fantastic for learning to crochet because it makes your stitches stand out, allowing you to see every loop and detail clearly. Plus, it pairs well with any other colours if you want to experiment.
Crochet Hook
As for the crochet hook, the general rule is that your hook should match your yarn weight.
For worsted weight yarn, a G-6 (4mm) hook is a great place to start. It’s not too big, not too small, and it feels comfortable in most hands.
Crochet hooks come in different materials—metal, wood, plastic, and even bamboo.
If you’re just beginning, a lightweight metal or plastic hook is probably your best choice.
These types let your yarn glide through the stitches with less friction, making the process smoother.
To get started I recommend this crochet hook set from Yarniss you can find it here on Amazon.
The design of these hooks features soft, rubberized grips that fit snugly in your hand, reducing strain and fatigue.
Perfect for All Skill Levels
With 14 hook sizes ranging from 2mm to 10mm, this set is versatile enough for every project. You’ll always have the right size handy.Smooth Hook Heads
The aluminium tips glide effortlessly through yarn without snagging or splitting, making it easier to keep your tension consistent—an essential skill for mastering single crochet stitches.
✵ More about crochet hooks: Understanding Crochet Hook Sizes and Types
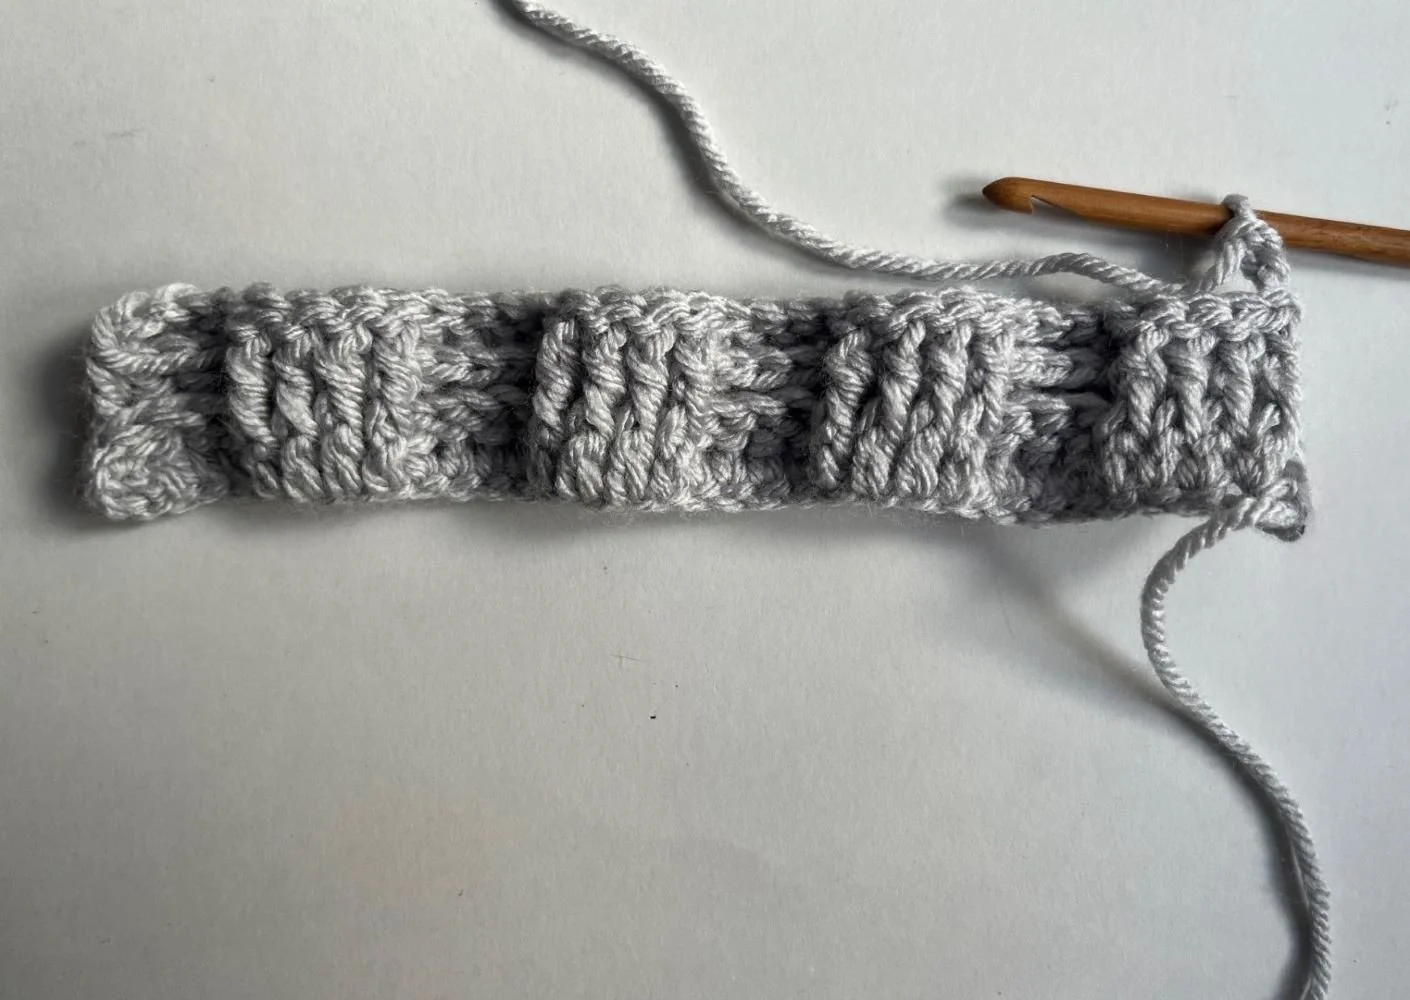
Crochet Basketweave Stitch
The basketweave stitch is a textured crochet pattern that resembles a woven basket, giving your project a thick, cosy feel. It’s made using a combination of front post double crochet (fpdc) and back post double crochet (bpdc) stitches, which create a raised, interlocking pattern.
The vertical part of a double crochet stitch is called the "post."
Instead of working into the top of the stitch like we normally do, when you’re making a Basket Weave, you’ll be working around the post itself. You can either insert your hook from the front of the post to the back or from the back to the front.
This wraps the stitch around the post, making it either stand forward or backward.
This pattern is worked in rows, so it’s easy to repeat and build up!
Skill Level – Easy
Pattern Notes
This pattern uses US crochet terms. The UK equivalent is provided.
I used a chunky yarn with a 6 mm hook.
Stitch abbreviation:
ch = chain(s)
st(s) = stitch(es)
dc = Double Crochet (US) equals a a tr = Treble Crochet/UK
fpdc= Front Post Double Crochet/ US equals a fptc=Front Post Treble Crochet/UK
bpdc= Back Post Double Crochet/Us equals a bptr= Back Post Treble Crochet/UK
Note: In the following instructions, I’ll spell out the abbreviations to make it easier for beginners who are just learning to read crochet patterns.
The ch-3 at the beginning of each round counts as a double crochet [UK: treble crochet].
Pin to Pinterest to save for later!
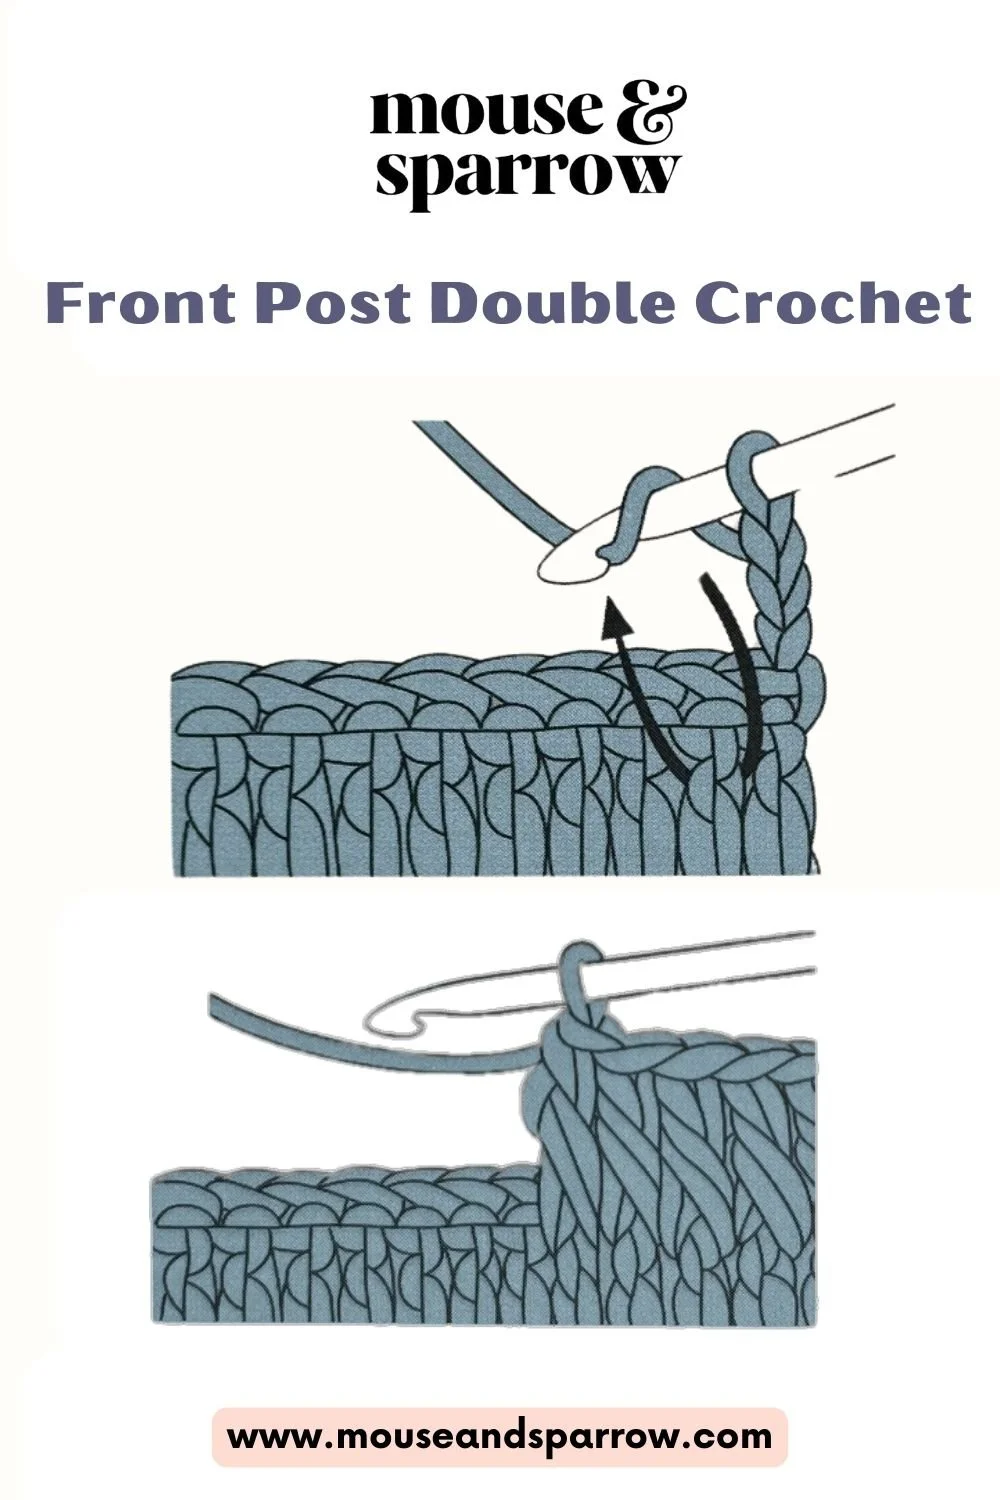
Insert the hook around the post as indicated on the row below.
Yarn over and complete the double crochet.
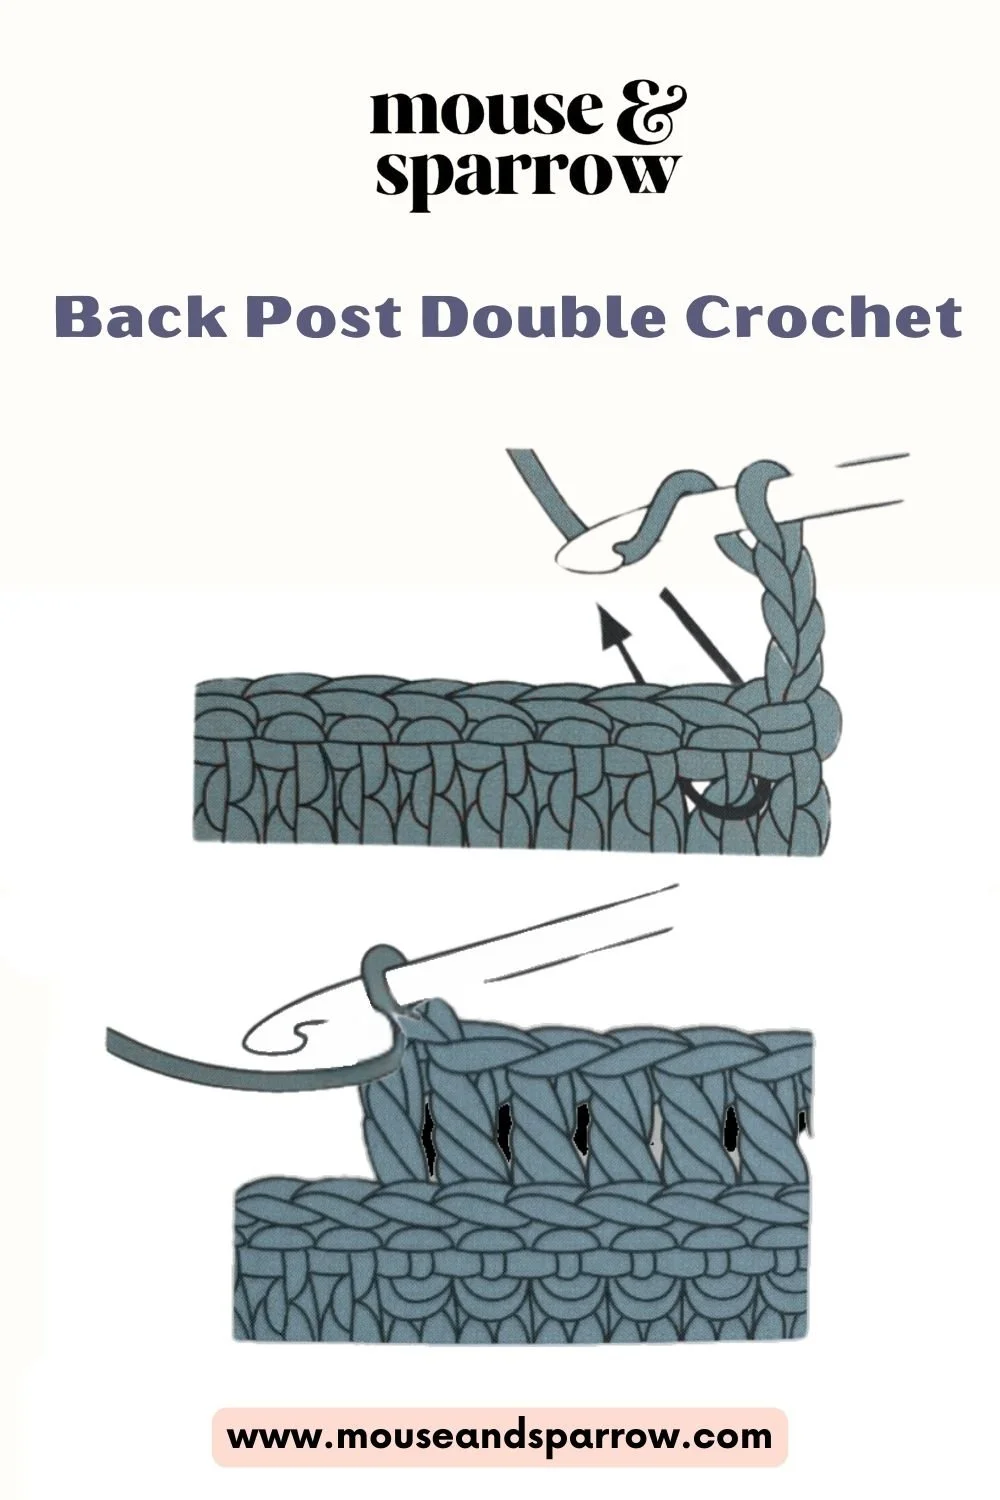
Insert the hook around the post from back to front.
Yarn over and complete the double crochet.
Start the Crochet Pattern
Instructions:
Foundation:
Chain 32 plus four. To make a smaller or larger square create a multiples of 8 then add 4.
Row 1:
In the 4th chain from the hook (the skipped 3 chains count as the first dc [UK: tr]), work 1 dc [UK: tr].
Continue to work 1 dc [UK: tr] in each chain across the row.
Chain 3 and turn your work.
Row 2 -4:
Front Post Double Crochet (FPdc) [UK: Front Post Treble Crochet (FPtr)] around each of the next 4 stitches.
Back Post Double Crochet (BPdc) [UK: Back Post Treble Crochet (BPtr)] around each of the next 4 stitches.
Repeat step 1 and step 2 across the row.
Chain 3 and turn your work.
Repeat this row two more times, for a total of three rows.
Row 5-7:
Work a Back Post Double Crochet (BPdc) [UK: Back Post Treble Crochet (BPtr)] around each of the next 4 stitches.
Work a Front Post Double Crochet (FPdc) [UK: Front Post Treble Crochet (FPtr)] around each of the next 4 stitches.
Repeat from step 1 and step 2across the row.
Chain 3 and turn your work.
Repeat this row two more times, for a total of three rows.
Row 8 and onwards:
Repeat Rows 2-7
Continue alternating the stitch pattern every three rows as established until your piece reaches the desired length or forms a square.
To finish:
Cut yarn, leaving a tail of about 15 cm.
Pull the tail through the last loop on your hook to secure.
Weave in all ends with a yarn needle.
Here are four tips to help you perfect Crochet Basketweave Stitch
▶ Understand Post Stitches: The basketweave pattern relies on front post double crochet (FPdc) and back post double crochet (BPdc) stitches. Familiarize yourself with these stitches, as they create the woven texture characteristic of the basketweave design.
▶ Maintain Consistent Tension: Keeping a uniform tension ensures that your basketweave pattern appears even and professional. Inconsistent tension can lead to uneven stitches and distort the woven effect.
▶ Count Your Stitches: Accurately counting your stitches is crucial, especially when alternating between FPdc and BPdc. This practice helps prevent mistakes and maintains the integrity of the pattern.
▶ Practice with Swatches: Before starting a larger project, practice the basketweave stitch on small swatches. This approach allows you to become comfortable with the stitch pattern and identify any areas needing improvement.
Ready to Create Your Blanket Squares?
Remember, every stitch you make gets you one step closer to something beautiful.
Crocheting isn’t just about the end result—it’s about enjoying the journey and celebrating each little victory along the way.
Take a deep breath, relax, and find joy in the process. You’re doing amazing!
Stay Inspired and Connected
Want to keep growing your skills and add more squares to your blanket?
Sign up for our newsletter to have the next part of the Weekly Pattern Sampler delivered right to your inbox.
Every week brings a fresh stitch and a new burst of inspiration!
And we’d love to see how you’re doing—share your squares and color combos with us to show off your creativity!
Happy crocheting!
What’s Next?
Pin this post: Save this tutorial to your Pinterest boards so that you can come back to it later.
Leave a comment: We love to hear your feedback. Tell me in the comments below!
Eco-friendly crochet kits for beginners
Easy crochet patterns for beginners
More inspiring posts


Feeling stuck between UK and US crochet terms? You’re not alone—and you’re not doing anything wrong. This guide breaks down one of the most overlooked crochet basics: the confusing stitch name switch between British and American patterns. Get clarity, skip the frustration, and get back to the fun part—actually crocheting.