
How To Crochet A Granny Square: Simple Step-by-Step Guide
This post may contain affiliate links.
A classic granny square is one of the first things I made when I started to crochet, and I’ve not looked back since. If you find it tricky to stick to one project at a time a granny square is the perfect amount of crochet for a quick session and each square gives me a sense of accomplishment.
They are like mini-projects, easy to make but also incredibly versatile. You can use them to create blankets, scarves, bags, and countless other projects. Plus, once you’ve got the hang of it, you can experiment with different colours and patterns to make each square unique.
Ready to learn how to crochet a granny square?


Granny squares are a crochet classic and the perfect way to use up scrap yarn. Whenever I have leftover bits, I love turning them into something new—whether it’s a little button case for my sunglasses or a granny square tote bag.
How to crochet a Granny Square
Before you start, gather the following materials:
Yarn in your preferred colour(s) (DK weight is commonly used for beginners) I recommend Lion Brand’s Basic Yarn to get started.
Crochet hook (usually 4mm or 5mm, depending on your yarn thickness)
Scissors
Tapestry needle for weaving in ends
Yarn Selection Tip: When learning how to crochet a granny square, you can use any yarn weight you have on hand and pair it with a suitable crochet hook. If you're unsure which size to use, check the yarn label—most will suggest the ideal hook size for the best results. You can find more information on how to find the best yarn for granny squares here and crochet hooks here.
Granny Square Crochet Terminology Guide

How To Crochet A Granny Square - Pattern
Pattern Notes:
Each round begins with a new colour in a corner chain-2 space.
The pattern forms a square with clusters of 3 double crochet stitches .
For corners: Work [3 double crochet, chain 2, 3 double crochet] in each corner space.
For sides: Work 3 double crochet in each space between corners
Keep adding rounds until your granny square reaches the desired size.
Important Note: This pattern uses US crochet terminology, where a double crochet (US) corresponds to a treble crochet in UK terminology.
New to crochet? Start here:
How to Do a Single Crochet
How to Start Crochet and Find Relaxation
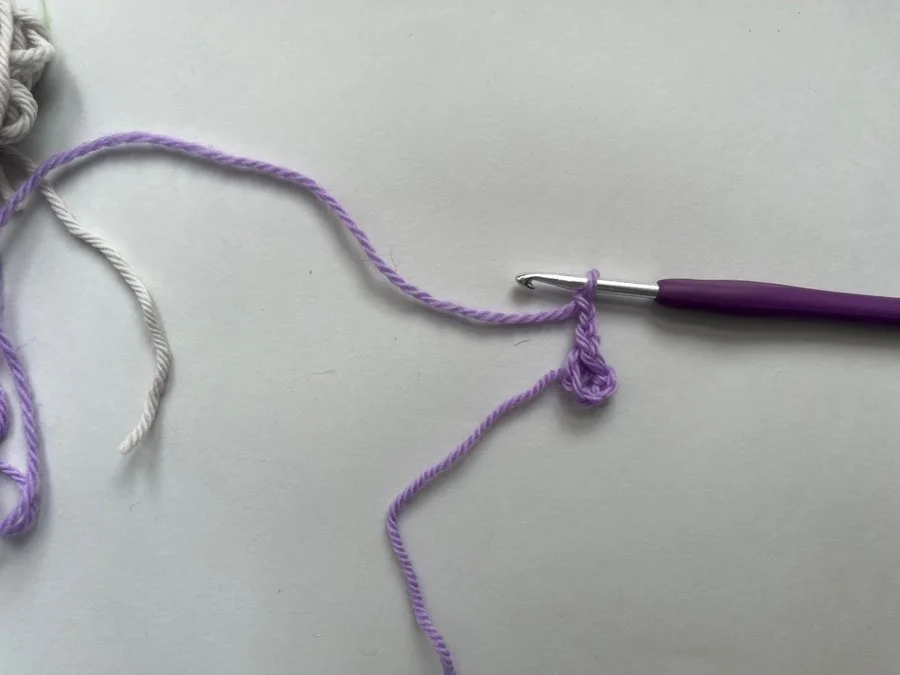
Creating the Centre Ring
Using Yarn A, make a slip knot and insert your crochet hook.
Chain 4 stitches.
Join into a ring by inserting your hook into the first chain stitch and making a slip stitch.
Round 1 (Yarn A):
Chain 3 (counts as your first double crochet).
Work 2 double crochet stitches into the centre of the ring.
Chain 2 (this forms the first corner).
Work 3 double crochet stitches into the canter of the ring.
Chain 2 (second corner).
Work 3 double crochet stitches into the centre of the ring.
Chain 2 (third corner).
Work 3 double crochet stitches into the centre of the ring.
Chain 2 (fourth corner).
Join with a slip stitch to the top of the beginning chain 3.
Fasten off Yarn A.
Round 2 (Yarn B):
Join Yarn B in any corner chain-2 space with a slip stitch.
Chain 3 (counts as first double crochet).
Work 2 double crochet stitches into the same corner space.
Chain 2 (forms the corner).
Work 3 more double crochet stitches into the same corner space.
In the next corner space: Work [3 double crochet, chain 2, 3 double crochet].
In the next corner space: Work [3 double crochet, chain 2, 3 double crochet].
In the last corner space: Work [3 double crochet, chain 2, 3 double crochet].
Join with a slip stitch to the top of the beginning chain 3.
Fasten off Yarn B.
Round 3 (Yarn C):
Join Yarn C in any corner chain-2 space with a slip stitch.
Chain 3 (counts as first double crochet).
Work 2 double crochet stitches into the same corner space.
Chain 2 (forms the corner).
Work 3 more double crochet stitches into the same corner space.
Work 3 double crochet stitches into the next space.
In the next corner space: Work [3 double crochet, chain 2, 3 double crochet].
Work 3 double crochet stitches into the next space.
In the next corner space: Work [3 double crochet, chain 2, 3 double crochet].
Work 3 double crochet stitches into the next space.
In the next corner space: Work [3 double crochet, chain 2, 3 double crochet].
Work 3 double crochet stitches into the last space.
Join with a slip stitch to the top of the beginning chain 3.
Fasten off and weave in all ends.
How to crochet a granny square step by step


Tips for Neat and Even Granny Squares
Consistent Tension: Maintain an even tension throughout your work to ensure all stitches are the same size.
Blocking: Once finished, you can block your granny square by pinning it to a mat and lightly spraying it with water. This helps to shape and flatten it.
Weaving in Ends: Use a tapestry needle to weave in all loose ends to prevent them from unravelling.
New to crochet? This should help: A Beginner's Guide to Crochet: Starting Your Journey to a More Relaxed You
What's Next? Keep Crocheting!
Congratulations—you’ve just learned how to crochet a granny square!
Now that you’ve mastered the basics, the possibilities are endless. Experiment with different colors, textures, and stitch variations to create unique designs. Why not start a vibrant granny square blanket or a chic tote bag?
I’d love to see what you're making! Share your creations and connect with fellow crocheters in our community for more inspiration and tutorials.
Happy Crocheting!
What’s Next?
Pin this post: Save this tutorial to your Pinterest boards so that you can come back to it later.
Leave a comment: We love to hear your feedback. Tell me in the comments below!
Eco-friendly crochet kits for beginners
Easy crochet patterns for beginners
More inspiring posts


Feeling stuck between UK and US crochet terms? You’re not alone—and you’re not doing anything wrong. This guide breaks down one of the most overlooked crochet basics: the confusing stitch name switch between British and American patterns. Get clarity, skip the frustration, and get back to the fun part—actually crocheting.